Privacy Canada is community-supported. We may earn a commission when make a purchase through one of our links. Learn more.
How To Install a VPN on Your Router for Max Security
A virtual private network, better known as VPN, is a system that routes all of your online traffic through a secure, encrypted channel rather than the normal stream of your internet service provider.
Many corporations and organizations require their employees to use a VPN when connecting to internal resources from a remote location. But enabling a VPN from home also has advantages, including the ability to disguise your primary IP address and securing your entire home

VPNs are typically set up through local clients that are installed on individual computers or mobile devices. Once the service is activated and enabled, all data packets are transferred through the VPN tunnel.
However, in today’s society where a family could have dozens of internet-connected devices in the home, from smart televisions to thermostats to refrigerators, you may prefer to route all of your local wi-fi connections through a VPN channel (Read more: best VPNs in Canada).
The best way to accomplish this is by setting up a VPN directly on your router. It is recommended to test your VPN strength before starting any installation to avoid having to make changes in the future should you decide to switch, because you will have to go over everything again to make it work and the process may end up slightly differently depending on the VPN provider you are using.
Once you have decided, follow the steps below to get started with this process.
Step 1: Choosing a VPN Service
Before you can install a VPN on your local wi-fi router, you will need to obtain credentials through a service that offers VPN connectivity.
When signing up for a VPN service, be wary of any offer that claims to be free, rarely you’ll find good free VPNs. The best and most secure VPNs require a monthly or yearly payment plan. Also be sure that that the VPN supports router-based configuration like NordVPN, rather than just desktop-based connections.
Step 2: Purchasing a Compatible Router
Shopping for a new wi-fi router can be tricky, as many manufacturers will claim to offer the best speeds and functionality. If security is your focus, you’ll want to focus on brands and models that offer VPN connectivity through standard firmware.

A VPN connection is typically configured on a router through one of three VPN protocols: PPTP (Point-to-Point Tunneling Protocol), L2TP (Layer 2 Tunneling Protocol), or OpenVPN protocol.
OpenVPN is the recommended protocol to use, given that it offers full end-to-end encryption and the highest level of security. You may notice some slowdowns in your local network once OpenVPN is enabled, but the downsides are worth the advantages it offers.
If you plan to be using your VPN router in a corporate setting, consider upgrading to a business class router that can support more simultaneous connections and faster speeds. These obviously come at a higher cost, but typically include better manufacturer support and warranties. Consider checking out our list of the best VPN routers to make sure you set up a compatible system.
Step 3: Configuring WAN Settings
Once you’ve subscribed to a VPN service and obtained a router that supports its protocol, you can begin configuring the network settings directly on the device.
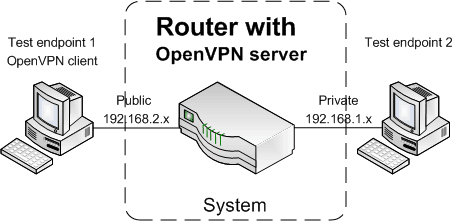
Since routers do not have display screens on them, you will need to connect to the router’s settings through a web browser. Make sure your computer is connected to the local network and then navigate to 192.168.1.1.
When the router’s homepage loads, you will be prompted to authenticate with an administrative username and password. If you do not know what these are set to, check a search engine for your router’s model number and you should be able to obtain the device’s default credentials. Note that you may need to perform a factory reset of the router in order to restore the original username and password.
From the main list of router settings, look for a category called “Wide Area Network” or “WAN“. This area is responsible for determining how your local network connects to the wider internet.
First, make sure your router is set up with an Automatic IP connection type. Then enter the following two DNS addresses in the available fields: 208.67.222.222 and 8.8.8.8. If your router supports different DHCP query frequencies, use the Aggressive Mode option.
Make sure to click “Save” or “Apply” to preserve your WAN settings.

Step 4: Enabling VPN Client
Now switch to the “VPN” menu of your router’s configuration page.
You may see two options at the top of the screen: one for VPN server setup and another for VPN client setup. You want to use the VPN client setup, as this will allow your router to function as a single VPN access point for all of the devices on your local network.
Click the “Add Profile” button to begin setting up a new VPN connection. You’ll first be prompted to choose between PPTP, L2TP, or OpenVPN. Make sure you choose the one that’s supported by your current VPN service provider.
In order to complete the VPN setup process, you’ll need to fill in a few more important pieces of information. Under “VPN Server,” enter the full address of the VPN service that you are using to connect. This information should be found in your VPN provider’s online documentation, and it should look like a common web address.
After that, you’ll need to input the username and password that you have set up through your VPN provider. Note that this will not match the credentials you used to log in to the router’s configuration page (Read more: VPN basics guide).
Be aware that depending on how your VPN provider sets up accounts, your username may actually be your full email address.
Once you’ve saved the VPN profile, you’ll return to the main window and see the details added to the list of VPN settings.
All you need to do is click the “Activate” button to enable the VPN service on the router. Certain hardware models may require a full restart for the new settings to take effect.
Step 5: Browsing While on a VPN Client
Now that your router is configured with a VPN service, all new and existing devices that you connect to wi-fi will automatically have their internet traffic routed through a secure, encrypted tunnel.
You can deactivate the VPN at any time, but doing so will turn it off for all devices on your network.
Final Thoughts
As you can probably tell by now, it is more cost-effective and overall a much better idea to use a VPN Router to install a client on every single device at home. There’s no need to remind family members every single day to turn on their VPN client connection or to never turn it off even while at home, no need to worry about other types of activities being susceptible to privacy breaches.
If you are a traveler, setting up a VPN router may not provide you much advantage due to the VPN service being literally fixed on the router. You are better off with a location independent setup, one that doesn’t involve a router and only VPN applications.


