Privacy Canada is community-supported. We may earn a commission when make a purchase through one of our links. Learn more.
DNS Leak: What Is It and How Can You Stop It?
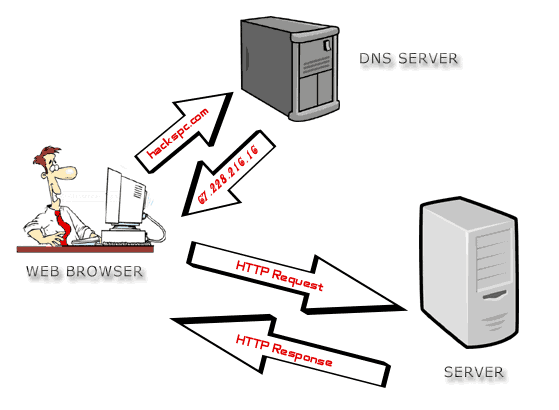
A Domain Name System, or DNS, is simply a decentralized naming system for services and computers that are connected to the internet.
In other words, the DNS is used to connect your IP address with the website domain. Whenever you enter a web name, it is sent to a DNS server where the domain name will then match it to your IP address, allowing the request to be forwarded.
Make sense?
But as great as this may sound, the truth is that this poses a major issue for privacy. Since your internet traffic is essentially passing through a DNS server, this means that your destination and your information are always being logged…and it also can’t be encrypted.
Yes, the communication between the website and your computer can be encrypted (so long as it shows as ‘https’ in your URL), but the addresses of the recipient and the sender cannot.
So to put this into perspective, this means that every website you visit will be known to whoever has access to your DNS log. Therefore, if a hacker gains access top it, you have virtually no privacy in regards to where you’re going on the internet.
This is where a VPN, or Virtual Private Network, comes into play.
How Does a VPN Work?
Both paid and free VPNs are designed to facilitate a gap between the website you’re visiting and your website in order to keep your information private. It accomplishes this by forging an encrypted connection between the VPN server and your computer. The server of the VPN will then send the request to the website you’re wanting to visit.
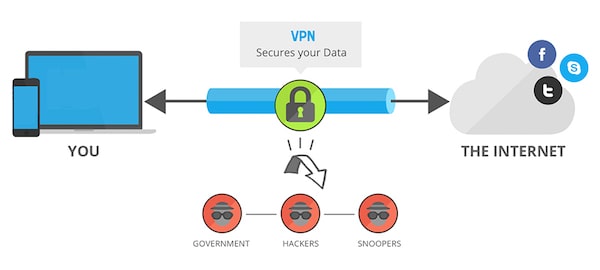
Assuming that the VPN is working properly, the ISP (internet service provider) will not be able to see where the VPN is connecting you, nor will it be able to view any of your content because it’s all encrypted.
That being said, it’s still possible for a DNS leak to take place where the DNS data still leaks back to the ISP.
What Happens When a DNS Leak Occurs?
A DNS leak is simply when your VPN server is bypassed, essentially ruining the purpose of using a good VPN in the first place. Even though the content of your traffic remains encrypted, your location and your browsing data are left exposed out in the open, leaving you vulnerable to any type of dangerous cyber security breach.
What Causes a DNS Leak?
One of the most likely reasons you may suffer from a DNS leak is if you connect to the internet with different networks. For instance, you may regularly connect to the internet using your router at home, but then later you may connect to it using the Wi-Fi at a coffee shop or library.
If you fail to use the proper settings to allow your VPN to connect, you’re going to leave yourself exposed. This is because when you connect to a new network, the DHCP settings in your computer will assign a DNS server, which may belong to an improperly secured ISP. Even if you do manage to connect your VPN to the new network, the DNS request can still bypass it.
How Do You Solve This?
If you configure your computer’s VPN to use the DNS server that is preferred by the VPN, then it will force all DNS requests to go directly through the VPN rather than the local network.
The issue is that not every VPN provider has its own DNS server, so they may use an independent DNS server instead that allows any DNS request to bypass your VPN.
To prevent this from happening, what you need to do is make your VPN provider connect (automatically) to the correct DNS server regardless of which local network you are using. To do this, you’ll need to get in touch with your VPN client for instructions.
How Can You Stop Future DNS Leaks?
What are some actions you can take to reduce the chances of a future DNS leak?
There are a number of steps you can taker to limit the chances of a DNS:
- Change Your Settings To A DNS Server That You Trust

Your router will have a way to change your TCP/IP settings, which allows you to specify the DNS servers you trust based on their IP addresses. Several VPN providers will also often have a DNS server, so when you use your VPN it will connect you to the DNS servers that you trust.
In the event that your VPN lacks these DNS servers, you’ll have to use a third party open DNS server instead (Google Open is an example). If using Windows, you can change the DNS settings in the control panel. Under the “Network and Internet” section you can specify your trusted DNS servers under “Use the following DNS server addresses.”
- Block Non-VPN Traffic
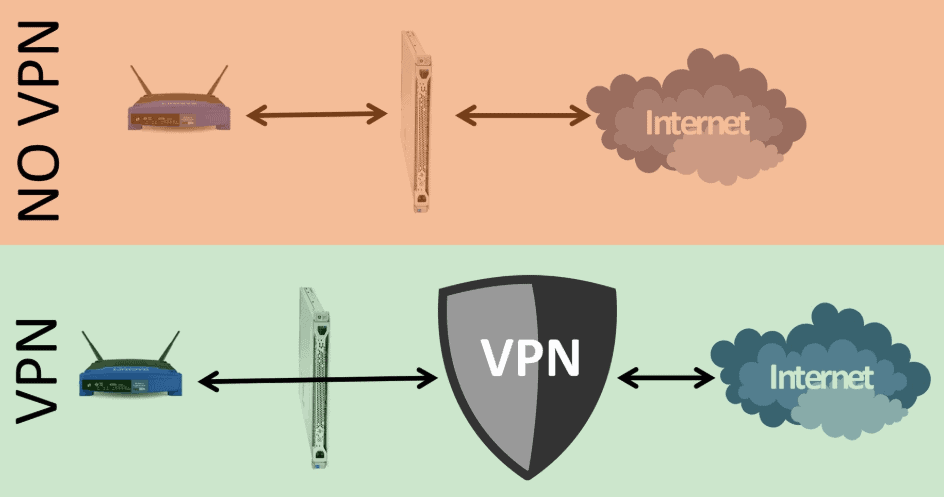
Some VPN’s will also allow you to block any and all traffic that does not go through the VPN. If your VPN client does not have this, you can configure your firewall to only allow traffic in and out through the VPN instead.
Just go to the Network and Sharing Center of the Windows Firewall settings, and confirm that your VPN is set to a Public Network. Then, go to Advanced Settings and select “Inbound Rules.” Proceed to “New Rule” and then “Program” followed by “All Programs.” Choose a program that you want to block all non-VPN traffic to, and then select “Block the Connection.” Make sure that both “Private” and “Domain” are clicked but not “Public.”
- Monitor or Change Your VPN
Your other primary options at this point will be to either monitor or change your VPN. Monitoring your VPN with monitoring software will be an added expense, but it allows you to track your VPN’s traffic to see if your DNS goes to the wrong server.
Otherwise, you should consider switching your VPN to a new provider that is fully IPv6 compatible, that has built-in DNS leaked protection, and the ability to counteract any transparent DNS proxies.
Need VPN Recommendations?
If you’re up for a little value for money research, then allow us to point you to the right direction.
NordVPN gives you the option of selecting from a variety of VPN protocols, and has dedicated DNS servers to further secure your online privacy. It has blazing speeds and over 2,000 servers well spread out in almost 150 countries.
Could it really get any better than that?


