Privacy Canada is community-supported. We may earn a commission when make a purchase through one of our links. Learn more.
How to Test VPN Strength (Simple 4 Step Process)
A virtual private network (VPN) client can be a very valuable tool. It can connect any internet-enabled device, like a computer, tablet or smartphone, through an encrypted channel that can’t be monitored by your internet service provider (ISP).
Many corporations, universities, and other organizations distribute a VPN client to all employees and staff and require it when working remotely. That way, outside connections are kept secured and internal resources are safe to use.
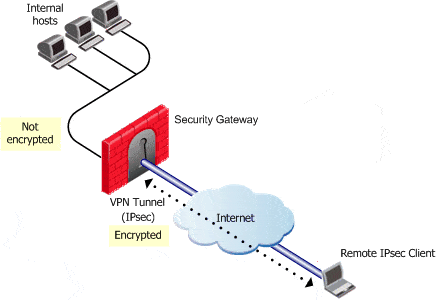
But because of the way VPN clients work, there’s always a chance of experiencing slowdowns and other performance issues with them. Instead of having all of your traffic flow directly from your local network, through the ISP, and out to the internet, a VPN setup requires the traffic to add an additional step as it communicates with the VPN host server. If this server is located in another region of the world, delays are to be expected.
The current marketplace is full of VPN providers and solutions, some offer solid free VPN services and others require paid monthly or yearly subscriptions. In general, be wary of any free VPN service, as traffic levels will tend to be so high that you will routinely drop the connection.
But let’s say you are paying for a business-class VPN that advertises certain minimum speeds that you should expect, just like Surfshark or NordVPN. How can you verify that and test the strength of your VPN setup? Read on to find some useful tips.
Step 1: Set a Baseline
In order to measure the performance of any VPN service, you must first have something to compare it with. So, before connecting to your VPN client, launch a fresh web browser like Google Chrome or Mozilla Firefox on your desktop or laptop computer. Make sure the computer is connected to your local network with either wi-fi or ethernet.
Speedtest.net is widely considered to be the most accurate web tool for measuring the speed of an internet connection. Navigate to their homepage and wait for it to identify your current IP address and ISP. Then click the “GO” button to begin running a test.
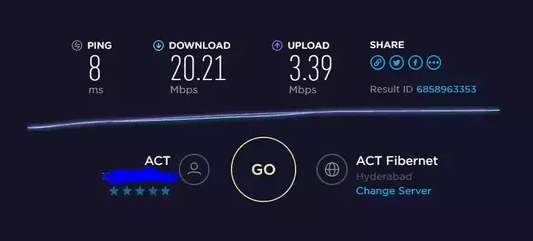
As the test begins, the tool will first identify the appropriate testing location to use based on where your IP is registered geographically. Then it will begin sending bits of generic data back and forth from your computer to the testing server. The entire test should last less than a minute, and once completed, results will immediately be displayed on the screen.
The test results will cover three key metrics: ping, download, and upload. The ping metric is simply a measure of how long it takes for your network to make initial contact with the testing server. It is measured in milliseconds. The download metric is the one that most people care about, as it measures how fast you receive data from the internet. Downloads are measured in megabits per second. The same goes for upload speeds, which describe how quickly data flows from your computer back to the web.
At the bottom of your speed test results, the tool will compare your connection’s performance with other ISPs in your region or country. Keep track of all your metrics to form a full comparison.
Step 2: Run Comparison Tests
Now close your browser and activate your primary VPN client on the computer. If your VPN service offers a range of server locations, make sure to select the one closest to you geographically. For example, if you are located in Montreal, pick a VPN server in the eastern part of Canada. Choosing a server from another region or country could skew your results.
Once the VPN client is activated, open the same web browser you used before and run another speed test. Don’t be alarmed if the test tool automatically chooses to run your test through a different server than before.
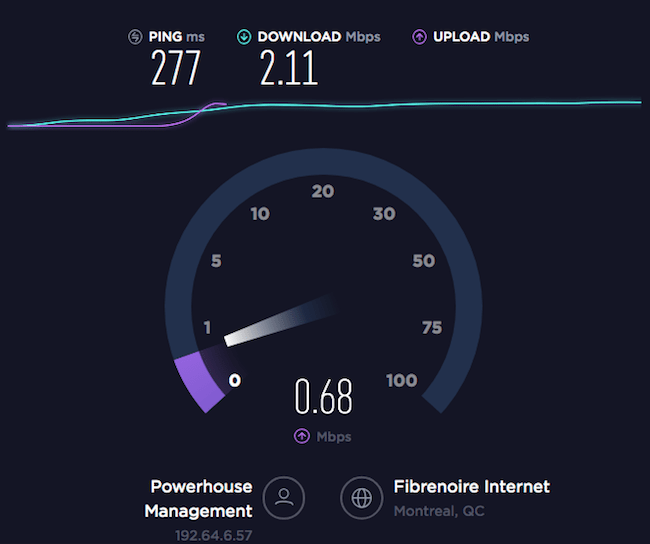
Also, consider running a set of speed tests with your VPN client over a period of several hours. Changes in VPN traffic can happen very quickly and sometimes cause temporary slowdowns to your network connection. It’s best to summarize all of your results and use the average as your comparison baseline. Find out more about our research and testing process.
Step 3: Test on Mobile
If you also use a VPN client on your smartphone or tablet, you should consider running separate speed tests from those devices. Hardware and network cards can make subtle differences when it comes to internet speed, so you want to ensure you have all your bases covered.
The Speedtest.net tool also works on mobile browsers, or you can download a separate app like Pingify, which is compatible with both iOS and Android.
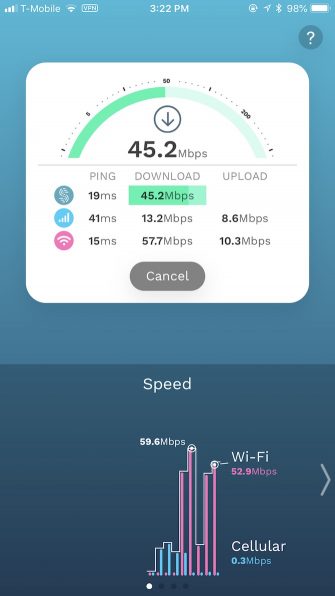
As part of your mobile testing, run some experiments with different local network connections. First, connect your VPN client to your home network and see what types of results you get. They should closely mirror the outcomes of your computer tests. Then turn off wi-fi on your smartphone and try the same test with VPN connected over a cellular data network.
Step 4: Analyze the Results
If you pay a subscription fee for your VPN service, you can typically contact the provider’s support team for concerns with network speed. Be sure to document your speed test results and share them appropriately.
Don’t forget that your VPN’s strength is heavily dependent on the speed of your own home or office network. If you only get 5 megabits per second downloads through your ISP connection, then a VPN will be capped at the same maximum speeds. You may want to troubleshoot your local network performance before turning your attention to the VPN.
If your VPN client is distributed by your college or company and you are experiencing issues connecting or slow speeds, talk to someone in the Information Technology team about other troubleshooting steps to take. Sometimes configurations can be made on the server side to deliver faster VPN connection speeds to all users.
You Might like:


